A Step by Step Guide to using GitFlow with TeamCity – Part 2 – GitFlow - a Branching Model for a Release Cycle

In Part 1 - I covered off a brief overview of the branching model differences between TFS and Git.
One of the most interesting developments to happen in the Git ecosystem (apart from its growing adoption rate) is the creation of the Git Flow branching model and its embodiment as an plugin extension to the core Git client libraries.
GitFlow sets out to answer the following questions that plague every software development team:
How can we:
- Keep our repository tidy?
- Have consistency between projects?
- Get our developers up to speed quickly with our procedures?
- Enable the team develop a feature in isolation from the main branch, but also allows them to collaborate?
- Stabilize before a production release?
- Manage production releases?
- Manage production hotfixes?
- Customize our codebase for a specific customer without that affecting another customer?
The solution GitFlow proposes is a prescriptive branching model, born of experience which answers the questions above, and a set of Git Extensions that allow you to manage and automate work through that model.
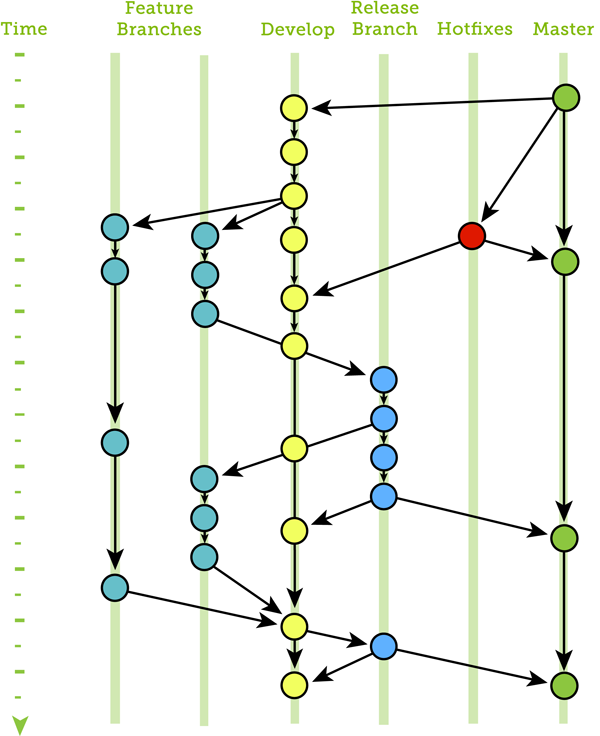
GitFlow specifies the following branch structure:
- main
- hotfixes
- release branches
- develop
- feature branches
Main
Instead of the main branch being the default bucket where all changes happen, in GitFlow the purpose of this branch is to contain code that's in a production ready state. You should be able to deploy code from this branch into production at any time and the code in this branch can be tagged with a specific release number to aid that process. This is quite a change for most development teams where 99% of the development happens in the main branch. GitFlow enables you to put a quality gate around the main branch, using workflow, as it requires actual effort to create a release, and then merge that release back into main.
Hotfixes
This branch is a special case for dealing with urgent defects discovered in production post release. The purpose of the branch is that you make a single change to fix the issue (you do not slip other features into this fix as this could introduce other stability issues). This change is then folded into the main branch and also into the develop branch.
Release Branches
This branch is used for gathering features for future release. This branch is also useful for release stabilisation - making changes required to fix issues discovered by any final exploratory testing.
Develop
This is the branch where "general" development activities can occur (rather than on the main branch). This branch can become the general bucket for all changes - but this is really not how it should be used. Any piece of significant work should be done inside a feature branch.
Feature Branches
These branches are for developing an individual feature - this can be dictation by a set of required changes, a backlog item, a bug - essentially any unit of work that needs to be carried out. These branches are short lived - they should not be used for weeks or months on end (otherwise you will incur large integration problems as code on this branch will be out of date compared to all the other work going on).
Visualising the Workflow
The easiest way to visualize the pattern is a process flow diagram, showing how changes flow through the development cycle. The arrows signify the creation of or merging of a branch, the dots represent a commit:
Just to re-iterate one point - branches should not be long lived - they are not another mechanism to allow developers to go dark: the longer a branch lives, the more pain you are incurring for yourself (and your team) when you come to re-integrate your changes. GitFlow is not a silver bullet to solve all your release cycle problems, it's a pattern and workflow for reducing the friction, but the work still has to be managed; hotfixes, features and releases have to be planned and managed - otherwise you have just added complexity to the chaos.
Installing GitFlow
There are two ways in which you can install GitFlow:
- Download getopt.exe & libintl3.dll from http://bit.ly/XdYcBc
- Extract and copy to: C:\Program Files\Git\bin
- Clone the GitFlow Repo, but running the following command from Git Bash:
$ git clone --recursive git://github.com/nvie/gitflow.git
$ cd gitflow
- Run
"C:\gitflow> contrib\msysgit-install.cmd"as Administrator
Or you can:
- Download https://dl.dropbox.com/u/5892928/DevTools/Endjin.DevTools.Git-Flow.7z
- Unzip and run Configure-GitFlow.ps1
As GitFlow is a series of Git command line extensions - you'll need a nice command line environment (if you don't already have one).
Using Chocolatey to install Posh-Git
Chocolatey seems to be one of those "best kept secrets" on the Microsoft world - it's essentially apt-get but based on the NuGet feed protocol. To install Chocolatey first you just need to open a command prompt and execute the following command:
@powershell -NoProfile -ExecutionPolicy unrestricted -Command "iex ((new-object net.webclient).DownloadString('http://chocolatey.org/install.ps1'))" && SET PATH=%PATH%;%systemdrive%\chocolatey\bin
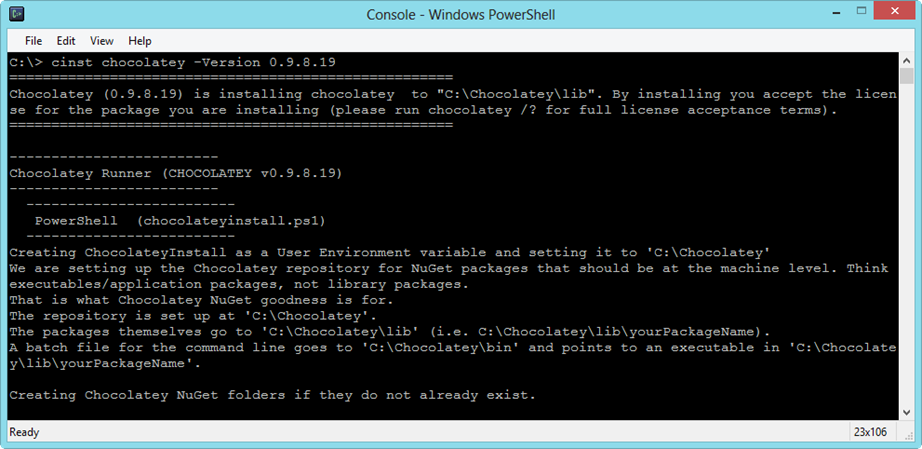
Now you have Chocolatey installed - you can use it to install Posh-Git - which essentially allows you to use Git from within your PowerShell environment. Issue the following command:
c:\> cinst poshgit
Chocolatey will locate, download and install Posh-Git.
When you navigate to a Git repo inside the PowerShell command environment you should get extra information about the state of the repo and which branch you are currently on. This is very useful when using GitFlow
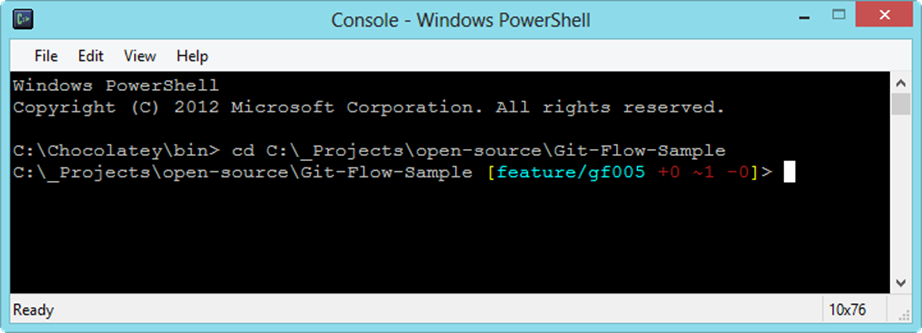
Now you should have your environment correctly set up to use GitFlow. In the next part of the series, we'll cover off how to actually use it.

