Using Git for .NET Development: Part 4 - Resolving Merge Conflicts
Following on from the previous post in this series which dealt with branching and pushing your changes, this post looks at how you can deal with merge conflicts. I'll describe when conflicts occur and how they can be dealt with using Visual Studio, and third party Git client SmartGit. The next post in the series will continue this theme, looking at resolving conflicts with Semantic Merge, a language-aware diff and merge tool which presents merge information visually.
Like the previous posts, this post was written as I learned about the process, and starts from the basics.
Merging recap
Firstly, a quick recap on the Git merge process. A merge is an operation carried out between branches. It is the process of pulling the changes made in one branch into another branch. In fact, with Git, a merge between three branches is possible, but I won't look at this option in this blog. A more typical merge scenario is working on a feature or fix branch, and wanting to keep it up to date with changes made by colleagues to the master/ develop/ other serious branch. This should happen frequently, to minimise the amount of conflicts you have to deal with at one time.
One thing I didn't make clear in the previous blog is that merge direction is important. A merge involves a destination branch and a source branch. The branch that you currently have checked out when you carry out the merge is the destination for the merge. Git refers to the current branch as HEAD, so you may see this term appear when merging. The HEAD/ destination branch will be updated as a result of the merge, to reflect any changes made in the source branch. The source branch is not updated as a result of the merge. Going back to the typical scenario above, I want to carry out merges to update my feature branch, but not to alter the develop branch, at least until my feature is complete.
Before you carry out a merge, you should make sure that the destination branch is checked out, and commit the latest version of this branch. Once you have checked out the branch you want to merge changes into, a merge is triggered using the command
git merge <name of source branch>
or using the merge options in Visual Studio's Team Explorer or a third party Git client, as described in the previous post.
Pull and push operations between separate repositories can also carry out a merge between the remote and local versions of the same branch, and cause merge conflicts. For simplicity, I'm going to focus on solving merge conflicts between two local branches in this blog.
What are merge conflicts?
During a merge, Git will update the set of files in your working tree (the set of files that you work on in Visual Studio) to reflect changes coming in from the source branch. In many cases, Git can carry out a merge automatically, leaving your changes in place and adding in the changes from the source branch, such as new files and changes to parts of the codebase that you've not altered. However, sometimes this is not possible, and it requires human intervention to choose how to merge two versions of an individual file. This is a merge conflict. Merge conflicts occur in relation to individual files in a codebase.
When do merge conflicts happen?
According to the Git docs, 'non-overlapping' changes in files can be automatically merged. A non-overlapping change is a change where one branch alters an area of a file while in the other branch this area is left intact. However, according to the docs "When both sides made changes to the same area … Git cannot randomly pick one side over the other, and asks you to resolve it by leaving what both sides did to that area".
When I first read this, I wondered what was meant by an 'area'. It suggests something more granular than a file, but does it mean individual lines in a file, or larger entities such as a code block? Code block structures vary by language, so it's hard to see how this could be used – although interestingly, Git's built in diff tool does allow you to specify a language, and csharp is one of the options. The conflicts I saw were normally triggered by changes to the same line. As a rule of thumb, if a line in a file has changed in one branch, but not the other, Git assumes that you want to keep the changed version. But if both versions changed the same line, it's a judgement call as to which person's change you want to keep.
However, saying that changes to the same line trigger a conflict is a simplification. Git's behaviour during a merge varies depending on the Git merge strategy in use. Git offers a range of strategies which can be used to solve conflicts:
- Recursive strategy – the default strategy when merging two branches. Uses a 3-way merge algorithm which uses the source branch, the destination branch, and the common ancestor of the two. Using a common ancestor gives Git context for any differences between the source and destination. It can tell which branch's version of a conflicted area represents a change. The strategy is able to detect and handle some merges involving renames, and exploit situations where the branches being merged have multiple common ancestors by generating a single merged version of these ancestors. The strategy offers a number of options that affect it's behaviour:
- Ours option – when there's a conflict, the version of the conflicted area in the destination branch is always chosen.
- Theirs option – when there's a conflict, the version of the conflicted area in the source branch is always chosen.
- Patience – takes longer but better able to "avoid mismerges that sometimes occur due to unimportant matching lines". Good for cases where branches have diverged a lot.
- Ignore-space-change/ Ignore-all-space/ Ignore-space-at-eol – as the names suggests, various types of whitespace differences are ignored.
- Resolve strategy – an alternative strategy when merging two branches. Like the recursive strategy, it uses a 3-way merge algorithm.
- Octopus strategy – the default strategy when merging more than two branches. More likely to require human intervention
- Ours strategy – the result of the merge is always the merge tree of the destination branch. Rather extreme! Not so much a merge as a way of pulling in the history of other obsolete branches before deleting them.
- Subtree strategy – a modified version of the recursive strategy. Useful when the merging two sets of files where one set is a subtree of the other.
You can read more about the different strategies available near the bottom of the Git docs Git Merge page, and on this helpful StackOverflow answer. The Git docs actually describe the recursive strategy as the default when merging 'one branch', and the octopus as the default when merging 'more than one', but I'm putting this down to a different use of terminology.
Different strategies are chosen automatically for different types of merges. Alternative strategies can be specified as command line options to the merge. Some strategies are more cautious than others, in a trade-off between automation and accuracy.
Coming back to the practicalities of using Git for .NET development, what types of changes that I make to a C# Visual Studio solution are likely to result in a conflict? From my experience using the default (recursive) merge strategy with 2-branch merges, I saw the following behaviour:
- Changes to different lines in method body in both branches' versions of a file – no conflict, each changed line is accepted
- Adding or removing a line in a method body in one file but not another – no conflict, the addition or deletion is accepted
- Changes to the same line in method body in both branches' versions of a file – caused a conflict
- Removing a method in one branch's version of a file and modifying it in the other – caused a conflict
- Changes to method or property names in both branches' versions of a file – caused a conflict
- Changes to method parameters in both branches' versions of a file – caused a conflict
- Changes to using statements in both branches' versions of a file – caused a conflict
- Moving the position of methods and properties in both branches' versions of a file – caused a conflict
- Reformatting a file by altering indentation etc in the same line in both branches' versions of a file – caused a conflict
- Deleting a file in one branch and keeping and changing it in the other – caused a conflict.
For the purposes of this blog, I created two new branches from a common source, made the changes listed above in both, then tried to merge the branches.
The types of conflicts that Git can and can't merge automatically using a particular strategy don't vary. What does vary is how far individual merge tools are able to guess a resolution for particular conflict types. Merge tools will try to recognise compatible changes or instances where one change should override another, and suggest a resolution.
In the case of semantic tools which 'understand' languages such as C#, they can deal with conflicts at the level of methods, properties, and classes, and therefore recognise non-conflicting changes more easily than an non-semantic tool. More on this in the next blog which covers Semantic Merge.
Merging terminology
Before we delve into resolving conflicts, here's an overview of some Git merge terminology I've come across in the tools I've used. These terms are used to distinguish the files involved in the merge.
- Base/ ancestor - the common ancestor of the file versions being merged.
- Destination/ local/ ours/ right/ target- the version of the file in the most recent commit on your current branch
- Source/ remote/ theirs/ left – the version of a file in the most recent commit on the branch that's being merged with your current branch
- Result/ working tree - the file as it is in your working directory, as a result of the merge. This may look like the source or destination, or it may include changes from both.
I'll be using 'source' and 'destination' throughout this post. I prefer these terms to 'remote' and 'local' which don't reflect that merges may be between two local branches, and I definitely prefer them to the rather confusing 'left' and 'right' – which I should warn might not always be used in this way.
What happens when there's a merge conflict?
You will be notified that there is a conflict – exactly how depends on which tools you're using. Any merges within files that can be made automatically will still go ahead, resulting in changes to the working tree. If you have the solution open in Visual Studio, you will be notified that the solution has changed outside of the environment and prompted to reload the files.
Files which cannot be merged automatically are marked up with Git conflict markers:
<<<<<<< indicates the beginning of the conflicted area. The version of this area from the destination branch is shown below this marker.
======= is used inside the conflicted area, to divide up to two alternative versions of this area. The version of the conflicted area from the source branch is shown below this marker.
indicates the end of the conflicted area.
(I rather wish the Git documentation on this didn't use an example with Barbie preferring shopping to merge conflict resolution! Oh well – it's a great resource apart from that.)
At this point, you manually resolve any conflict. At its most basic level, this just means editing then saving the file in the working directory.
Following a non-conflicting merge, if changes have been made to both branches, the new, updated state of the files in the destination branch is automatically staged and saved in a new commit on the destination branch.
When a merge conflict occurs the stage and merge commit need to be triggered manually, because you have to step in to resolve the conflicts, and Git has no way of knowing when you're finished - unless you tell it.
Abandoning the merge
Before we get started on resolving conflicts, it's useful to know what to do If a merge goes badly wrong, and you want to bin it and start again. You can do this through the command line with:
git merge --abort
This resets the working tree back to its previous state, before you began the merge operation.
In Visual Studio, there's an Undo Merge option in the Resolve Conflicts panel:
Conflicted merges can be undone in SmartGit by clicking the Merge button which will be highlighted with a red block to show there are conflicts, and selecting to abandon the merge.
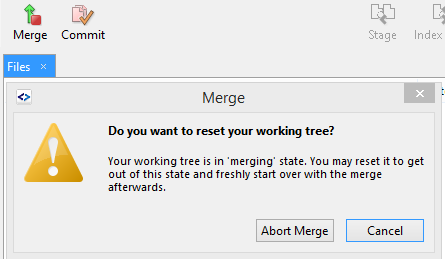
With that backup option at the ready, onto actually fixing the conflicts.
Resolving merge conflicts using the command line
It's possible to resolve conflicts using nothing but Git and a text editor.
If a merge conflict occurs, you will see the following message:
Auto-merging <file name>
CONFLICT (content): Merge conflict in <file name>
Auto-merging <file name>
… and so on for any other conflicted files, ending with:
Automatic merge failed; fix conflicts and then commit the result
Or, if the conflict is triggered by a deletion of a file in one branch which was modified in the other:
CONFLICT (modify/delete): <file name> deleted in <source branch> and modified in
HEAD. Version HEAD of <file name> left in tree.
Automatic merge failed; fix conflicts and then commit the result
To view a simple list of conflicted files, use
git diff --name-only --diff-filter=U
(Thanks to Charles Bailey via StackOverflow for that one).
To view exactly what is conflicted in a file, use:
git diff
If you are using Windows, keep hitting return to bring up the diffs for more files, or enter 'q' to exit the results of the diff and get back to the usual Git bash prompt.
To resolve the conflicts, you can open up conflicted files in a text editor, edit them to select the changes you want to keep, and save the changes. Then, stage and commit the files using
git add
(for each resolved file) and
git commit
However, merge conflicts are where visual conflict resolution tools really come in handy. You can open a graphical merge tool from the command line using:
git mergetool
If no files are specified, all conflicted files will be opened in the merge tool, one after the other.
If no merge tool is specified, Git checks the configuration variable merge.tool, and chooses a default if nothing is specified there.
After you close the merge tool, Git will check if the merge was successful.
Where a conflict is caused by the deletion of a file in one branch and a change in the other, the git mergetool command behaves rather differently – it prompts you to either use the modified file or use the deleted file.
Resolving merge conflicts with Visual Studio
As described in previous blogs, Visual Studio provides a set of tools for working with Git repositories through the Team Explorer panel. This includes a conflict resolution tool that lets you fix merge conflicts without leaving Visual Studio.
When you trigger a merge in Visual Studio which cannot be carried out automatically, you will see the message "Merge completed with conflicts. Resolve the conflicts and commit the results".

Click the link to Resolve the conflicts in this message. Then, click on the name of an individual file to view the resolution options for the file.
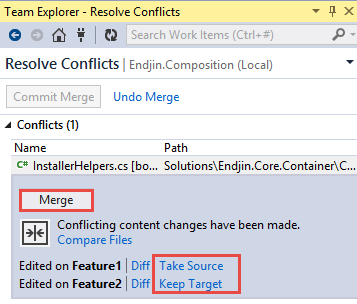
If you know that you want to take one branch's version of a file over the other branch's version, you can resolve the conflict using the Take Source or Keep Target options. These options correspond to Git's theirs and ours options for the recursive merge strategy.
To compare and pull in changes from both versions of the file, click the Merge button. This will open the conflict resolution tool inside Visual Studio.
The tool presents the source file, the target file, and the resulting file. The exact layout can be altered using the tools panel at the top of the merge tool. I prefer the mixed view which shows the resulting file below.

Visual Studio's conflict resolution tool has a feature I love. Each conflicted area is highlighted (like with most merge tools), but unlike most merge tools, there's a checkbox right next to each highlight, so you can select the version you want to take directly on screen. I find this very simple and easy to use.
Changes which Git or Visual Studio are able to merge automatically within the conflicted files are highlighted in green in the source and target files, and display a pre-ticked checkbox.
The changes which can't be automatically resolved are highlighted in a salmony pink, and have unchecked tickboxes.

To resolve the conflict, you check the change you want to keep.
At the top of the conflict resolver, there are options to navigate the first, previous, next or last conflict. The pane also presents information about the number of conflicts present, the number that could be automatically merged and how many remain to be solved:

When there are no more conflicts left to resolve, you can click Accept Merge in this pane to accept the new merged file.
From the set of conflict-triggering changes for Git I listed earlier, all except one still required manual resolution with Visual Studio. Visual Studio was able to guess a resolution to the case where a property was moved in both versions of a file … but unfortunately the guess was simply to take both changes as additions, and the property was duplicated in the suggested result file.
Resolving merge conflicts with SmartGit
If you trigger a merge using SmartGit which cannot be carried out automatically, you will see the following message:
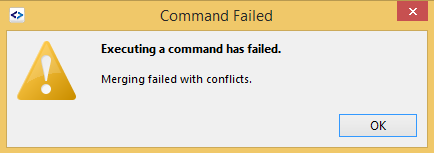
Conflicted files will be indicated in SmartGit's Files area showing the working tree for the destination branch. If there are a lot of files displayed in the working tree, sort the files area by State.

To resolve a conflict, right click the conflicted file, and select either resolve or conflict solver from the context menu.
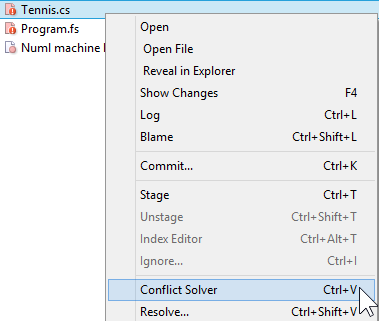
Resolve should be used when you know you want to keep one version and reject the other.
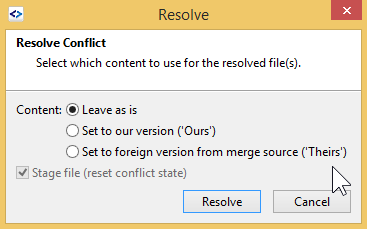
As with Visual Studio's Take Source or Keep Target, SmartGit's Theirs and Ours correspond to Git's theirs and ours options for the recursive merge strategy.
To manually select between changes in conflicted files, select Conflict Solver to open SmartGit's built in conflict solver tool.
Like Visual Studio, the SmartGit conflict solver displays the destination branch's version of the file, the source branch's version of the file, and the resulting merged file, using the terminology 'ours', 'theirs', and 'working tree'.
You can rearrange these windows in various ways:

SmartGit uses the term 'Change' to refer to any change between the two file versions, and the term 'Conflict' to refer to changes which lead to merge conflicts. Differences which could be automatically resolved are highlighted in green. Differences which couldn't be automatically merged are highlighted in pink.

You can navigate between conflicts in the file using the buttons to the top right of the window:

At first, I didn't find it that clear which change or conflict I was currently 'on' or what being on it meant. It turns out that navigating to the next change or conflict moves the cursor in the Working tree window:
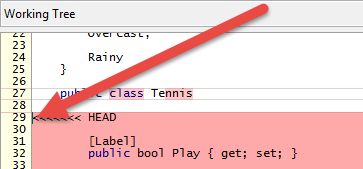
Navigation is slightly clearer if you have the windows arranged in the 'all' layout, where the working tree file is shown in the centre, and all files are scrolled in sync, with the highlights joining up across the windows.
To resolve a conflicted area, you can use the Take left or Take right options, or manually edit the working tree window.

Comparing this conflict solver to Visual Studio, I missed the checkboxes, and I also missed the field with information about how many conflicts there are and how many were resolved.
After using the Take left and Take right options or manually editing to create a merged version of the conflicted file in the working tree, click Save, then close the Conflict Solver.
Back in the main SmartGit interface, this prompts you to stage the file.

After all the conflicted files have been staged, you can create the merge commit.
From the set of conflict-triggering changes for Git I listed earlier, all still required manual resolution with SmartGit.
Conflict solver isn't the only way you can solve merge conflicts with SmartGit. It also offers integration with other conflict solving tools, as we'll see in the next blog, which describes dealing with merge conflicts with Semantic Merge.
Merging and csproj files
Since we're talking about resolving merge conflicts in .NET, there's one more specific topic I should cover.
Because the csproj file is altered whenever files or assemblies are changed in a solution, it's fairly likely that both branches will have modified the csproj file.
It's a common complaint of .NET developers using Git that when carrying out a merge, the csproj file either triggers merge conflicts, or is automatically merged, but this is done incorrectly – for example, both versions of the file's contents copied one after the other.
One suggestion for dealing with csproj merges is to use the 'union' strategy for these files. This can be configured by adding the following to the .gitattributes file:
*.csproj merge=union
The .gitattributes file is a repository-specific file that lets you add settings for particular paths (e.g. *.csproj).
Union is one of a set of three 'built in merge drivers' which can be specified in the .gitattributes file, the others being text and binary. According to the Git docs, union lets you "Run 3-way file level merge for text files, but take lines from both versions, instead of leaving conflict markers. This tends to leave the added lines in the resulting file in random order and the user should verify the result."
And indeed, judging by the comments out there, this what often happens – e.g. tags are missing and elements are nested incorrectly.
A recent blog by Phil Haack of GitHub describes how GitHub for Windows has moved away from union merges for csproj files, and now uses the default strategy, because this is more likely to result in a merge conflict, and manual resolution is (for now) the best option.
I haven't experienced particular problems with csproj files when merging (primarily using SmartGit), possibly because I'm working on fairly small projects.
If you want to always trigger a merge conflict if the csproj has been altered, you can ask Git to treat it as a binary file, by adding this to the .gitattributes file:
*.csproj merge=binary
Alternatively, this might be a case where the patience option for the recursive strategy could be employed.

