Adventures in Dapr: Episode 1 - Azure Service Bus
Introduction
In this first 'proper' post I plan to start small; the goal is to update the sample application to use Azure Service Bus rather than RabbitMQ for its publish/subscribe (or pub/sub) component.
The Dapr docs describes components as:
Dapr uses a modular design where functionality is delivered as a component. Each component has an interface definition. All of the components are pluggable so that you can swap out one component with the same interface for another.
They are the elements that allow you to switch implementations without changing your code ('just' the configuration) - or at least that's the theory and by the end of the post we will hopefully see this first-hand.
Before we start
There is a GitHub repository that supports the blog series (based on the Dapr Traffic Control sample).
If you haven't already got the original version of the sample solution running in self-hosted mode, then it's definitely worth doing this before continuing. It will be much easier to troubleshoot any issues if you know that it was working before you made any changes!
The detailed guide for doing this is available here.
The original version of the sample is available in a branch:
git checkout original-version
Running the sample
Assuming you have all the basics setup (i.e. Docker, a self-hosted dapr runtime) then this repo has a run-all-self-hosted.ps1 script that streamlines getting all the services running.
cd src
./run-all-self-hosted.ps1
On Windows, this should launch the 3 services in separate consoles (on Mac/Linux the services will still be launched but all within the original console), you can then start the simulation app to start generating vehicle traffic (on Mac/Linux you'll need to do this in a new console):
cd Simulation
dotnet run ./Simulation.csproj
You should be able to see requests flowing through the services as those naughty speeders are detected and fined - you can see the fine notification emails by browsing to the maildev container's mailbox interface.
Preparation
First things first, let's check out the documentation for pub/sub components, check that Azure Service Bus is supported and see what configuration details we're going to need.
https://docs.dapr.io/reference/components-reference/supported-pubsub/#microsoft-azure
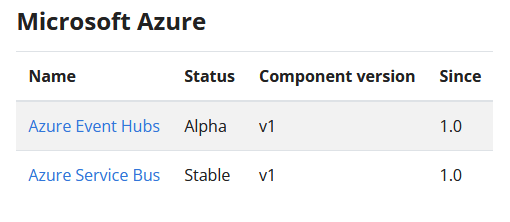
The above page answers the support question and the next link shows its configuration schema.
Most of the settings are optional, with the main one being the connection string of the target Azure Service Bus.
apiVersion: dapr.io/v1alpha1
kind: Component
metadata:
  name: servicebus-pubsub
  namespace: default
spec:
  type: pubsub.azure.servicebus
  version: v1
  metadata:
  - name: connectionString # Required
    value: "Endpoint=sb://{ServiceBusNamespace}.servicebus.windows.net/;SharedAccessKeyName={PolicyName};SharedAccessKey={Key};EntityPath={ServiceBus}"
The GitHub repository that supports this blog series has a branch for each post. In the blog/episode-01 branch we can see an updated version of the pubsub.yaml component configuration file, which is our starting point.
- First we change the
typeof the component frompubsub.rabbitmqtopubsub.azure.servicebus - Remove the contents of the
metadatablock and add the settings needed for Azure Service Bus - We need to give the component a connection string to our Azure Service Bus namespace - as this is sensitive information we should use a Dapr secret
Having done this, the pubsub.yaml should look something like this:
apiVersion: dapr.io/v1alpha1
kind: Component
metadata:
  name: pubsub
  namespace: dapr-trafficcontrol
spec:
  type: pubsub.azure.servicebus
  version: v1
  metadata:
  - name: connectionString
    secretKeyRef:
      name: pubsub.sbConnectionString
      key: pubsub.sbConnectionString
auth:
  secretStore: trafficcontrol-secrets
scopes:
  - trafficcontrolservice
  - finecollectionservice
Unlike the previous use of RabbitMQ, Azure Service Bus requires a connection string for authentication. To avoid storing plaintext secrets in this configuration file we have created a reference to a Dapr secret. Once we have provisioned ourselves an Azure Service Bus we will setup the actual value using the existing file-based secrets store.
You can compare the changes we had to make using GitHub's diff feature.
Develop our Infrastructure-as-Code
As mentioned in the introduction post, we'll be using Bicep to automate the setup of our Azure resources. We don't need very much for this first episode, but we'll structure the Bicep code with the expectation of having to add more later.
NOTE: If you want an introduction to Bicep before getting stuck-in, then check out Barry's post
In a new file called components.bicep file we will setup our Azure Service Bus resource:
- define parameters for any settings that will need to be customisable
- define and configure the Azure Service Bus resources
- define an output so we can obtain those Azure Service Bus settings we need for our Dapr component configuration file
param serviceBusNamespace string
param location string

resource servicebus 'Microsoft.ServiceBus/namespaces@2021-06-01-preview' = {
  name: serviceBusNamespace
  location: location
}

resource servicebus_authrule 'Microsoft.ServiceBus/namespaces/AuthorizationRules@2021-06-01-preview' existing = {
  name: 'RootManageSharedAccessKey'
  parent: servicebus
}

resource topic 'Microsoft.ServiceBus/namespaces/topics@2021-06-01-preview' = {
  name: 'speedingviolations'
  parent: servicebus
}

output servicebus_connection_string string = listKeys(servicebus_authrule.id, servicebus_authrule.apiVersion).primaryConnectionString
In another new file called main.bicep we will define the main deployment template which will follow a very similar pattern:
- define parameters for any settings (for the whole deployment) that will need to be customisable
- create a resource group
- reference
components.bicepas a Bicep Module to deploy the Azure Service Bus into the resource group (modules facilitate code re-use) - define outputs (for the whole deployment) that we will need to know, including those returned by ‘components.bicep'
@description('The target Azure location for all resources')
param location string
@description('A string that will be prepended to all resource names')
param prefix string

var rgName = '${prefix}-adventures-in-dapr'
var serviceBusNamespace = '${prefix}-aind-namespace'

targetScope = 'subscription'

resource rg 'Microsoft.Resources/resourceGroups@2021-04-01' = {
  name: rgName
  location: location
}

module components 'components.bicep' = {
  name: 'aind-components-deploy'
  scope: resourceGroup(rg.name)
  params: {
    location: location
    serviceBusNamespace: serviceBusNamespace
  }
}

output servicebus_connection_string string = components.outputs.servicebus_connection_string
Provision Infrastructure
The next step is to deploy the Bicep template and get our Azure Service Bus provisioned. A deployment script is available to:
- Prompt for the required prefix that will be used to derive names etc.
- Ensure you are logged-in to Azure PowerShell
- Deploy the Bicep template
- Display the outputs so you can copy/paste them into the relevant Dapr configuration files
Open a PowerShell console in the root of the git repository and following the steps below:
PS:\> cd src/bicep

PS:\> Connect-AzAccount -SubscriptionId <your-subscription-id> (if not already logged in you should get taken to a web page to authenticate)

PS:\> ./deploy.ps1
cmdlet deploy.ps1 at command pipeline position 1
Supply values for the following parameters:
ResourcePrefix: <your-naming-prefix>
Location: <your-preferred-azure-location>

Name               : <your-subscription-name>
Account            : <your-user>
Environment        : AzureCloud
Subscription       : <your-subscription-id>
Tenant             : <your-tenant-id>
TokenCache         :
VersionProfile     :
ExtendedProperties : {}

Press <RETURN> to confirm deployment into the above Azure subscription, or <CTRL-C> to cancel:
Once the deployment begins you should see messages similar to the following:
VERBOSE: Using Bicep v0.4.1008
VERBOSE:
VERBOSE: 17:46:48 - Template is valid.
VERBOSE: 17:46:49 - Create template deployment 'deploy-aind-ep01'
VERBOSE: 17:46:49 - Checking deployment status in 5 seconds
It will take a couple of minutes to run the first time, but once deployed successfully you should be presented with output similar to this:
ARM provisioning completed successfully

Portal Link: https://portal.azure.com/#@<your-tenant>/resource/subscriptions/<your-subscription>/resourceGroups/<your-prefix>-adventures-in-dapr/overview

Service Bus Connection String: Endpoint=sb://<your-prefix>-aind-namespace.servicebus.windows.net/;SharedAccessKeyName=RootManageSharedAccessKeySharedAccessKey=<your-secret-key>
Browsing to the provided Portal Link, you should see the new resource group containing one resource, that being our Azure Service Bus namespace:

Clicking on the Service Bus Namespace resource you should see the metric graphs showing no activity.
Configure the Azure Service Bus Authentication
Now the Service Bus is provisioned, we have the connection string details that applications will need to communicate with it. As mentioned above the pubsub component configuration is expecting to read the connection string from a Dapr secret store. For convenience, the sample uses the Local File secret store component. (Spoiler: In future posts we will migrate this to use an Azure Key Vault instead)
Open the file dapr/components/secrets.json and substitute the *** Paste the Bicep output 'servicebus_connection_string' here *** placeholder with the value of the Service Bus Connection String output from the Bicep deployment. This should be of the form:
Endpoint=sb://<your-prefix>-aind-namespace.servicebus.windows.net/;SharedAccessKeyName=RootManageSharedAccessKeySharedAccessKey=<your-secret-key>
Save the updated file and you're ready to test.
Testing our changes
If all our changes have worked, the sample should appear to run exactly as before, except this time we should see messages flowing through our new Azure Service Bus.
Refer to the Running the sample section above to restart the services and run the simulation.
When everything is running, looking at the output of the Traffic Control Service (TCS) you should periodically see log messages showing a speed car has been detected:
== APP == info: TrafficControlService.Controllers.TrafficController[0]
== APP ==       Speeding violation detected (17 KMh) of vehiclewith license-number 86-LXD-6.
Switching to the Fine Collection Service (FCS), you should be able to correlate the above with messages similar to the following:
= APP == info: FineCollectionService.Controllers.CollectionController[0]
== APP ==       Sent speeding ticket to Abel Yanagi. Road: A12, Licensenumber: 86-LXD-6, Vehicle: Mitsubishi Eclipse Cross, Violation: 41 Km/h, Fine: tbd by the prosecutor, On: 17-12-2021 at 04:31:47.
The TCS and FCS services communicate via the pubsub mechanism, so if you can see the above then your migration to Azure Service Bus has been successful - well done!
If you re-visit the Azure Portal and refresh the page showing your Azure Service Bus metrics, then you should see evidence of messages being processed:

That's it for this post. We've achieved the following on this first outing:
- Used Infrastucture-as-Code to provision an Azure Service Bus to act as our publish/subscribe back-end
- Updated our Dapr configuration to swap-out the use of RabbitMQ for an Azure Service Bus Topic
- Tested that the services continue to function correctly without any code changes
Now a lot of the initial legwork is out of the way, subsequent posts will be able a bit more focussed.
One of the less ideal things we done in this post is to store the Service Bus connection string in an unencrypted text file. To address this, in the next post we will figure out how we can store that credential in an Azure Key Vault instead whilst not breaking any of our services.

